What’s Raspberry Pi ?

The Raspberry Pi is a series of small single-board computers developed in the United Kingdom by the Raspberry Pi Foundation to promote the teaching of basic computer science in schools and in developing countries.
According to the Raspberry Pi Foundation, over 5 million Raspberry Pis were sold by February 2015, By November 2016 they had sold 11 million units, and 12.5m by March 2017,In July 2017, sales reached nearly 15 million. “Wikipedia”
Why Raspberry Pi ?
- Raspberry Pi is small and cheap (35$)
- The Raspberry Pi is using Linux as operating system
- It is very easy to connect to internet
- Can be programmed using variety of programming languages
- The raspberry pi affords digital GPIO pins. These pins are used to connect other electronic components.
-
Supported by a large community , Raspberry Pi projects are everywhere. You can always find cool projects online, tutorials, and help from the community through forums, blog posts.
What you will need to start ?
The Raspberry Pi ships as just the single-board mini computer. There are a few additional components you will need before you can get started.
- Raspberry Pi to get start you need the RPI board itself ( you will decide which RPI you have to use according your project requirements and RPI features this link have a comparison between all RPI versions )
 Raspberry pi models comparison table.
 - Power supply ( You should use a regulated power supply that is rated at 5V ±5% and at least 700mA (or 0.7A) (for PI models 1 and 2, use 2000mA for model 3). Anything bigger than 700 mA (like 1000mA) will also work. Avoid using the smaller chargers used for small GSM phones, as these are often unregulated and unreliable )
- USB keyboard and mouse
- microSD card
- USB card reader
- A monitor
- An HDMI cable
- An ethernet cable or Wifi dongle
Step 1 : Setup SD card (installing the OS)
- Download Raspbian Wheezy Linux from here. and unzip it to a directory. please try using 7Zip (Windows) or The Unarchiver (Macintosh) or Unzip (Linux).
- Insert your microSD card into the USB card reader.
- Connect the card reader to your computer.
- Download SD Formatter according your OS Mac or Windows. Linux instruction below. Format your SD even it is new !
- Download Etcher and install it . or use ApplePi-Baker as it is a free utility that allows you to create a NOOBS SD, write an IMG file to SD card, or backup an SD card to IMG, with only a few simple clicks. on Windows is using Win32 Disk Imager.
- Open Etcher, Apple Pi-Baker and win32 imager then select from your hard drive the Raspberry Pi
.imgor.zipfile you wish to write to the SD card. - Select the SD card you wish to write your image to.
- Review your selections and click ‘Flash!’ to begin writing data to the SD card.
Linux Installation :
Insert your SD card and get mount information
When you insert your SD card the system asks you whether you want to mount it or not. Mount it, so you can explore its contents from the file explorer.
Run df to find mount point and device name
Run df command and find your device in /dev directory.For me it was /dev/mmcblk0. The output is goint to appear as the following:
linux@ubuntu:~$ df
Filesystem     1K-blocks     Used Available Use% Mounted on
/dev/loop0      25948028 13156440  11473496  54% /
udev             1018844        4   1018840   1% /dev
tmpfs             410444      872    409572   1% /run
none                5120        0      5120   0% /run/lock
/dev/sda6       42074200 35229872   6844328  84% /host
none             1026108        0   1026108   0% /run/shm
/dev/mmcblk0     1946896        4   1946892   1% /media/mysdcard
Unmount the SD card
umount /media/mysdcard
Format SD card in FAT 32
sudo mkdosfs -F 32 -v /dev/mmcblk0
Copy .img file to SD card using dd
sudo dd bs=1m if=DISK_IMAGE_NAME of=DEVICE_NAMEsudo dd bs=1M if="/home/linux/2017-08-16-Stretch-raspbian.img" of=/dev/mmcblk0
Step 2 : Power Up Your Raspberry pi
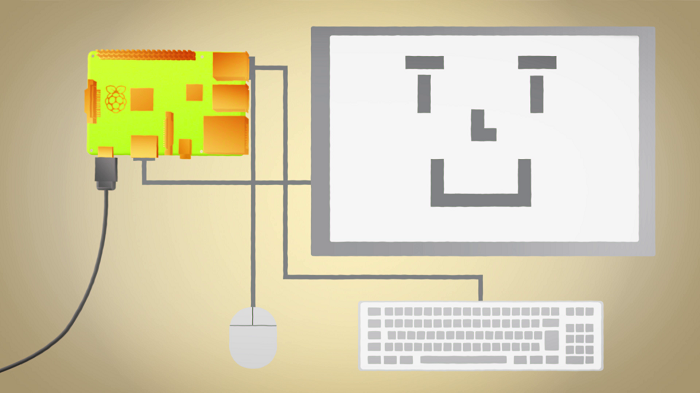
- Insert the microSD card into the card slot on the underside of the Raspberry Pi.
- Plug the USB keyboard and USB mouse into one of the USB ports.
- Plug the HDMI cable into the monitor.
- Connect an ethernet cable to your router or connect the Wi-Fi adapter to the Raspberry Pi.
- Plug the power supply into the power outlet. This will turn on and boot up Raspberry Pi.

Image by Raspberry Pi Foundation, CC BY-SA
the Raspberry PI should begin to boot and you should see a display on the screen as shown below.
Step 3 : Setting Up Raspbian :
- First things start with connecting to the internet.
- Click on the network icon in the top right corner and choose the appropriate wireless network. Enter the security key when it is requested.
- Open the Raspberry PI settings by clicking the menu icon in the top left corner and selecting “Preferences” and then “Raspbian Configuration”.
- From the Raspberry PI Configuration screen click on the “System” tab and click the “Expand Filesystem” button. This allocates the entire SD card to the operating system.
- It will ask to reboot accept and reboot your RPI.
Heyhoooo your Raspberry Pi is Ready Now let’s go to next article to figure out Raspberry pi OS and more …..


